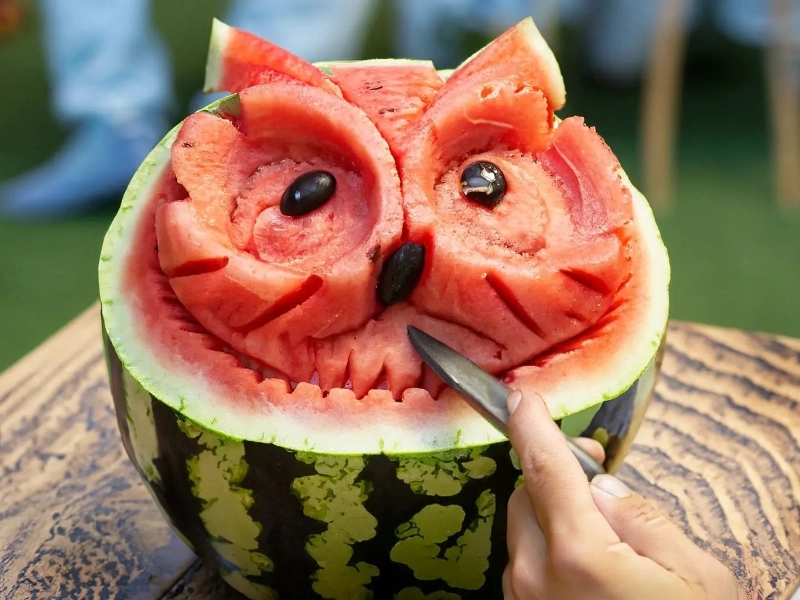
Watermelon Carving Art: Make Your Summer Party Stand Out
Advertisement
4. Basic Carving Techniques for Beginners
Advertisement
Embarking on your watermelon carving journey can be both exciting and intimidating. However, with the right techniques and a bit of practice, even beginners can create impressive designs. Here are some fundamental carving techniques to get you started:
Preparation: Before you begin carving, wash the watermelon thoroughly and dry it with a clean towel. Place it on a stable surface, preferably a non-slip cutting board. Have all your tools ready and within reach.
Sketching: Start by lightly sketching your design on the watermelon's surface using a food-safe marker or a soft pencil. This will serve as a guide for your carving. For beginners, simple geometric patterns or large floral designs are good starting points.
Basic Cuts:
1. Straight Cuts: Use a sharp knife to make clean, straight cuts. Keep your fingers away from the blade and use slow, controlled movements. Practice making vertical and horizontal lines of varying depths.
2. V-Cuts: This technique involves making two angled cuts that meet to remove a V-shaped section of rind. V-cuts are great for creating outlines and adding depth to your design.
3. U-Cuts: Similar to V-cuts, but with a rounded bottom. These are useful for creating softer, more organic shapes.
4. Paring: Use a paring knife to carefully remove thin layers of rind. This technique is perfect for creating gradients or revealing the lighter green or white layers beneath the dark green exterior.
Surface Carving: This technique involves removing only the dark green outer layer of the rind to create a design. Use a vegetable peeler or a shallow gouge to carefully scrape away the surface, revealing the lighter color underneath. This is an excellent technique for creating intricate patterns without compromising the watermelon's structure.
Relief Carving: In this method, you carve away the background, leaving your design raised above the surface. Start by outlining your design with shallow cuts, then gradually deepen the background areas. Be careful not to cut too deep and puncture the flesh of the watermelon.
Piercing: For more advanced designs, you can cut all the way through the rind to create openwork patterns. Start with simple shapes like stars or hearts before attempting more complex designs.
Scooping: Use a melon baller or a small scoop to create perfect spheres or hemispheres. These can be used to add texture to your design or create separate decorative elements.
Texturing: Experiment with different tools to create various textures. A zester can create fine lines, while the tip of a vegetable peeler can make interesting patterns.
Layering: Combine different carving depths to create a three-dimensional effect. Shallow surface carving can be used for fine details, while deeper cuts can define major elements of your design.
Smoothing: After carving, use fine-grit sandpaper to gently smooth any rough edges. This gives your carving a more polished, professional look.
Preserving: To keep your carving fresh, especially in warm weather, mist it lightly with a mixture of lemon juice and water. This helps prevent browning and keeps the cut surfaces looking crisp.
Safety Tips:
- Always cut away from yourself and keep your fingers clear of the blade.
- Use a slip-resistant cutting board to prevent the watermelon from moving while you work.
- Take breaks if your hands get tired to avoid accidents caused by fatigue.
- Wear cut-resistant gloves if you're concerned about nicks and cuts.
Practice Exercises:
1. Start with simple geometric shapes like triangles, squares, and circles.
2. Progress to basic floral designs, like daisies or sunflowers.
3. Try carving letters or simple words.
4. Experiment with different depths to create shading effects.
Remember, watermelon carving is as much about patience as it is about skill. Don't be discouraged if your first attempts aren't perfect. Each carving is an opportunity to learn and improve. As you become more comfortable with these basic techniques, you can start to combine them in creative ways to produce more complex and impressive designs.
Keep your designs simple at first, focusing on clean lines and basic shapes. As your confidence grows, you can tackle more intricate patterns and 3D designs. With practice, you'll develop your own style and signature techniques, transforming ordinary watermelons into extraordinary works of art that will be the highlight of any summer party.
You May Like
Advertisement